Introduction
XIKP is a means of graphically building flows of arbitrary complexity and of running them over a network of machines, or on many CPU's within a machine, in parallel if appropriate, to gain processing speed. This tool has been used by a number of BUs on sun and SGI networks. It also runs on the Intel platform under the Linux OS. When run in parallel on n CPU's speedups approaching n-times have been noted. This latest version also implements optional load balancing as described in the section on Host.
Doug Horn (Mr. xsd) wrote the initial Motif port of the system from the original product that we obtained from Roger Davis through ftp to Lamont. Joe Wade has since fixed innumerable bugs resulting in a reasonably robust product that is used throughout the corporation in both 2D and 3D processing.
(1) a process is an executable program that does something to a data stream or creates a data stream, e.g. filt, grep.
(2) a net is a flow of connected processes.
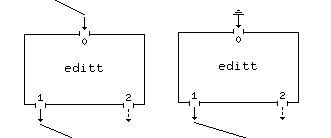
(3) a connector is either an input for a data stream (e.g. stdin), an output for a data stream (e.g. stdout), or an output for error messages (stderr).
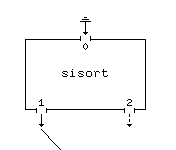
(4) the draw area is the graphical zone on the XIKP main panel in which flows are built.
(5) accelerator keys are a combination of one or more keystrokes designed to replace a mouse menu selection. All alphabetic key strokes are lower case even though in the text they are refered to as upper case - this is to avoid confusing an "l", say, with a "1". An example of a key combo is "ctrl+R" which translated means "hold the control key down and type the "r" key.
The figure above shows the results of entering
-
XIKP &
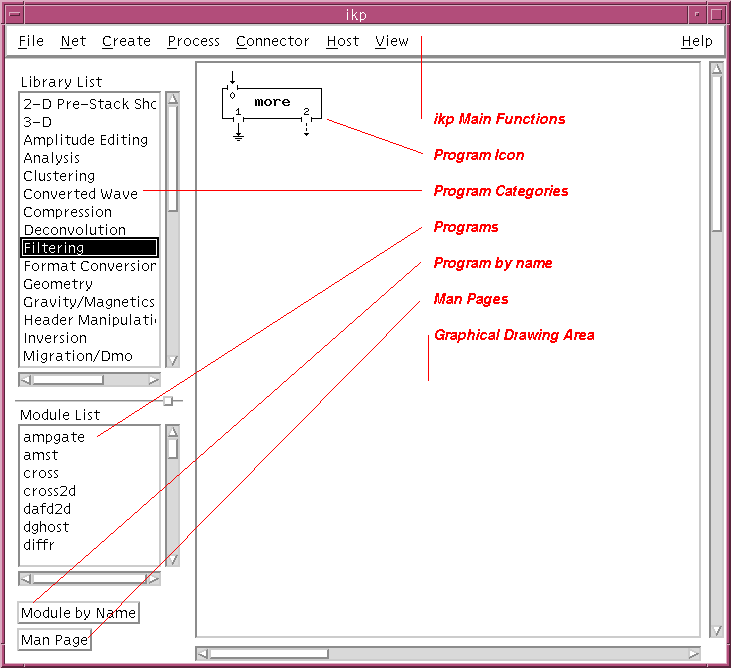
The top bar of the XIKP window has 6 basic functions: File, Net, Create, Process, Connector, Host, and View. These are stubs for popups which are either activated with the left mouse button, or by holding down the meta key (on either side of the space bar) and hitting the alphabetic character underlined (e.g. <meta>-f to activate the File popup).
One the left side of the main menu panel are two scrollable windows, the top one labelled "Library List" being the listing of all categories in USP (e.g. Trace Editting), and the bottom one "Module List" being the actual programs within the chosen category (you have to double click on the category to "select" it).
At the bottom of the menu panel left side are two buttons: the upper one labelled "Module by Name" and the lower one labelled "Man Page". If you know the actual name of the program you want and don't want to mess with selecting a category and then selecting the program name from the module list you can use this button. Also the manual page for any selected program (single mouse click) can be accessed by clicking this button.
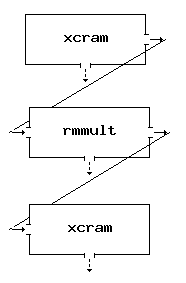
Let's suppose we want to build a net to read data from tape, do an rmmult, and write the results to tape. For this net we'll need a Source process, a USP process, and a Sink process. The Source and Sink we get from the Create menu stub at the top of the main XIKP panel; the rmmult process we get by first selecting (double left click) "Multiple Attenuation: transform methods" from the Library List (it also helps to have your favourite web browser running to quickly scan the functional man page listings in USP) and then selecting "rmmult". When the "angle iron" is in the position you want left click to drop the rmmult box finally yielding:

The Source and Sink box menus are filled out with the proper commands as discussed in the examples above. In addition the "Label" entry has been filled out to properly identify the box. Using the middle mouse button click in the sensitive zone of the "xcram -r" output connector then do the same for the "rmmult" input connector. Repeat for the "rmmult" to "xcram" connection.

This net is now fully connected. The stderr (dashed arows) connectors can be left hanging. We need only to fill out the rmmult menu panel and it will be ready to run and process data tape-to-tape (after filling out the device selection menus the two xcrams will popup when started up of course). Be sure you have a proper .rhosts file in your root directory (see section on .rhosts later in this note).
Filling Out a Menu Panel
Using the example above, left click in the rmmult box will bring up the menu.

There are two basic parts to any menu panel:
Some users hate filling out menu panels and there is an alternative - the Filter Script boxes (under "Create"). In the above example we could have replaced the rmmult box with a Filter box.
The filled out menu panel for the above rmmult Filter box would look like:
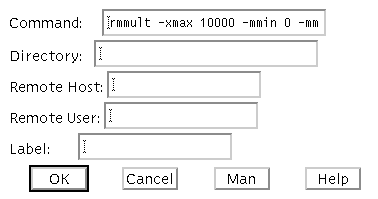
In the Command area is the rmmult command line with all the desird command line arguments.. It wraps out of view but you can move forward or back using your arrow keys. The Directory area contains the location of the printout files. In this case it is left blank. The default printout file location is the current valid directory which can be obtained from the File menu in the main XIKP menu selection. The Remote Host and Label areas have also been left blank. If you wished to execute this node on a specific machine you would indicate the machine name in the Remote Host entry. Anything you enter in the Label area will appear on the icon in the graphical net representation.
Another way of doing this is to build an executable script file, say run_rmmult, containing the entire rmmult command line without of course the input and output files names. The name of this script file including the full path is then put in the Command area of a Filter or Script box. The file run_rmmult than contains:
rmmult -xmax10000 -mmin0 -mmax4000 -rmin100 \
-rmax4000 -mute
Note if there are any files required, e.g. mute xsd picks, then the full path name must be given if running remote or if the file exists in another directory.
Note that you must make the script file readable and executable by everyone:
chmod ugo+rx run_rmmult
There are added benefits to using the script file and the Script or Filter box method. If several processes are piped together putting the commands in a script file reduces the user overhead of filling out multiple menu panels. Also when running these processes on remote machines the script file method has somewhat less ikp overhead than running the same processes explicitly as separate process boxes (although this amounts to only 1 to 5 percent of the total job).
This is a file that is a companion to the .rhosts file and will be used by the automatic load balancing feature of the new XIKP. It lists the machines one can use on the network and their relative measure of performance. A typical example is:
gpss66 0.100000
gpss62 1.000000
gpss24 1.000000
gpss41 1.000000
gpss80 0.500000
gpss89 0.500000
gp15 1.000000
gp15 1.000000
gp15 1.000000
gp15 1.000000
gp15 1.000000
gp15 1.000000
gp15 1.000000
gp15 1.000000
gp16 1.200000
gp16 1.200000
gp16 1.200000
gp16 1.200000
This file lists the machines by name, e.g. gpss62, obupsw7, and gives a figure representative of their relative performance. A sparc10 for instance is listed as a performance rating of 1.0, a sparc2 would be about 0.5. Notice in this listing gpss66 was given a rating of 0.1 even though it is a sparc10. This is because gpss66 will be designated as the local or data server machine and so should not be included in the auto-parallelization.
To allow for automatic selection based on the current load average on the individual nodes, simply specify a '*' in the process box for the remote host. This allows the IKP daemon to starts the various parallel jobs on the hosts that exhibit the least work load at that time.
The user must insert in his .rhosts (in his home root) file all the names of the machines he intends to use in his network including the name of his own machine. An example is:
149.181.162.228 zpgg07
teacher.trc.amoco.com zpgg07
149.180.101.7 zpgg07
teach1.trc.amoco.com zpgg07
149.180.101.1 zpgg07
teach2.trc.amoco.com zpgg07
149.180.101.2 zpgg07
teach3.trc.amoco.com zpgg07
149.180.101.3 zpgg07
teach4.trc.amoco.com zpgg07
149.180.101.4 zpgg07
teach5.trc.amoco.com zpgg07
Each machine is referenced twice: once with the actual ip address (e.g. 129.230.12.68) and once by machine name (e.g. gpss52). The ip address can be determined by typing in the command
ip
on each machine. If the script ip does not exist then enter
ypmatch `your machine name' hosts
The .rhosts must be readable by everyone.
Parallel Processing over a Network
Let's extend our example to demonstrate using multiple machines to increase throughput. What this will entail is splitting up the data (either record by record or trace by trace) sending successive chunks (records or traces) to the remote machines, e.g. record 1 to machine 1, record 2 to machine 2, record 3 to machine 3, record 4 to machine 4, record 5 to machine 1, and so on for the case of 4 remote machines. This divides the total processing load among n computers and depending on network speeds and traffic can give almost n-times speedup.
First you must make sure the ikp daemon has been installed by your system administrator (see installation instructions in the appendices). You can easily check to see if a remote machine is a candidate by building and running:
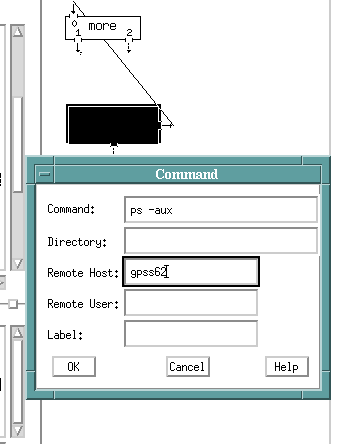
A Source box was selected and connected to one of the prebuilt nets called more (which really runs an xcat). The Source box menu is filled out with a ps -aux command (check the processes running) and with the remote machine name filled out. When this net is run (ctrl-R) successfully a scrollable xcat window will appear after a few seconds with the process information from the remote machine.
Possible errors include:
(1) Host [machine name] unknown: this machine doesn't exist on the network.
(2) Cannot connect to host [machine name]: the remote machine is either down or the ikp daemon has not been installed or the machine is not listed in your .rhosts file.
(3) Socket read error: ikp cannot start up the deamon on the remote macine.
(4) Authorization or Authentication error: remote machine is not in your .rhosts file. Another cause of this error is a renaming of the machines on the yellow pages server (unbeknownst to the user). Even though you can rlogin to a remote machine XIKP fails. You can check this type of problem by rlogining into the suspect machines and entering
whence -D
The response will be information about who is logged in, their terminal id, and most importantly the hostname. If this is different from what you think is your machine name then the proper name must be put in the .rhosts file (in fact you can put both the aliased name and the yp name in the file). From that remote machine rlogin to the next remote machine and repeat the process, going from each remote machine to the next until all have been checked.
Anything other then your .rhosts file at this stage is a problem for your system folks.
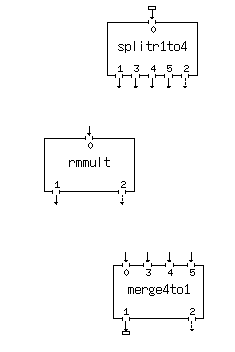
Now let's build a parallel net. This time we'll assume the input data is on disk and that the output will also go to disk. The first step is to raid the Trace Editing category for the data server and collector programs. We will assume 4 remote machines with your local machine as the data server/retriever (it's more efficient to keep major work off the server (local) machine). Therefore we'll need to split the data up into 4 streams and collect it back again. These programs are called splitr1to4 and merge4to1 (note there are others for even more parallel branches). Then we choose the process(es) we want to run remote - in our case it was rmmult. So far we have:
Note the input and output data files have been attached to the splitr and merge processes. If XIKP sees the working directory on the local machine we use just the file names rather than the full paths.
A single rmmult process box has been dropped. We will fill out its menu panel in entirety including the remote host and full path to the printout directory as well as the rmmult parameters themselves. Then we will use the Process Copy (C key) to duplicate this process box 3 times. We then look at the three other menu panels. They will be identical to the first one we filled out. The only change to make is the Remote Host entry in the header portion of the menus. This done we connect the sockets as shown (here we have not used the load balancing feature and have forced each remote process to run on a particular machine):
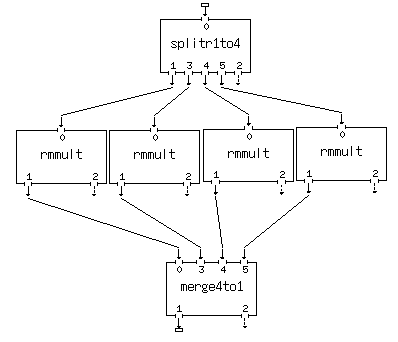
Click and bring up the menu panels for the splitr and merge process boxes. Their default states are to do rotary distribution of seismic records (i.e. gathers with more than a single trace). If any process in the parallel arms is a record-type process (i.e. requires a whole gather like rmmult) then the splitr panel should be toggled to rotary record mode and the merge panel should be toggled to gather in records back-to-back. If all process in the parallel arms are single trace processes (e.g. pred, filt) then the splitr panel must be toggled to rotary traces and the merge toggled to multiplex traces and clcik Yes to restore original number of traces/record. Failure to observe these rules could result in bad performance characteristics for the parallel nets. The majority of nets will probably be of the rotary record type since record-type processes are usually more compute intensive and can benefit more from parallelization.
The above net is ready to run but before you do anything else save it by clicking on the File menu stub and selecting one of the save options. It's a good idea to fire up some perfmeters set to the remote machine so you can see what's happening. Fortunately perfmeter has a properties panel that allows entry of a remote machine name. Or you can enter several lines in a script file
rsh [machine name] xload
...
rsh [machine name] xloadThen enter the script name and whatch the xloads appear.
When running complicated pipelined flows (e.g. radonf | polymute | taupred | radonr) it is highly recommended that the script method be used, i.e. the pipeline with all command line arguments (without input and output data files, of course) be put into a script and the script name with full path be used as the Command in a Script or Filter box.
Parallel Processing on a Multi-CPU Platform
Today's multi-CPU platforms [mainly SGI but recently also SUN ] are used for most of our high end computing needs. The ability to parallelize CPU instensive steps in the flow has helped with the throughput of large chunks of this processing. XIKP is the tool of choice in the USP community for adding horsepower to a processing flow. To make use of more machine bandwidth simply add legs to the net as above in the network processing example. In this case however there is no need to file in the remote host entry in the program or filter menu. The individual machine OS will take care of load balancing and CPU assignment for you.
In the case of the SGI platform there are two useful tools to help tune your processing load to the equipment available:
osview

Here stats are shown for each CPU as well as system level information on I/O and Memory load. What you want to see here is %user stats as high as possible and %syts stats as low as possible. When this is true the machine is expending most of its effort on the task at hand and very little on managing the task. When you see %sys numbers as high as or higher than %user you have overloaded the system. Once you have a net built you can add legs to the parallel flow until this condition is reached. Then simply drop a leg or two until the stats recover. This is known as tuning the load on the system. Of course if you are not the only user on the system this may be problematic. For a lot of our 3D processing however, we do use dedicated equipment so in practice this does actually happen.
top
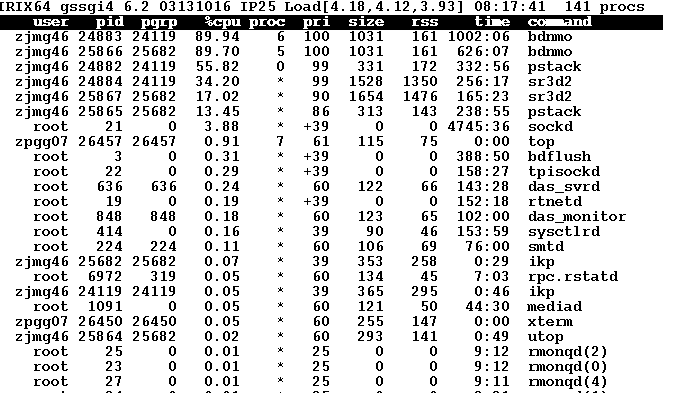
is another useful tool for use while parallelizing flows. It allows you to see the effective load of each element of your net. You can also quickly see who else is on the system and what they may be up to. System loads can be quite high and still allow effective processing. We have seen system loads over 140 on our 8 CPU SGI Power Challenge during some parallelized decompression flows.
One you've determined that remote machines can be accessed other errors can intrude. Here are some key ones and possible solutions.
(1) Process [process name] exited with status 7: the process is unknown or not executable. This usually is caused by a misnamed script you are trying to run inside a Script or Filter box.
(2) Process [process name] exited with status -99: this means you were trying to run a remote process that was either unknown or was not an executable.
(3) Directory access error: remote or locally means that the directory specified in the Directory portion of the menu(s) could not be found
(4) Cannot open file [file name]: file either does not exist or you could not write to it. If it exists check permissions. Also if you're trying to write to someone elses directory you may not have write permission. Such errors can ocurr if you don't properly fill out the Directory entries since remote processes might try to write a printout file into another users private storage.
(5) File access error on host [machine name]: same as (4) except it was the remote process that returned the error.